| 일 | 월 | 화 | 수 | 목 | 금 | 토 |
|---|---|---|---|---|---|---|
| 1 | 2 | 3 | 4 | 5 | 6 | |
| 7 | 8 | 9 | 10 | 11 | 12 | 13 |
| 14 | 15 | 16 | 17 | 18 | 19 | 20 |
| 21 | 22 | 23 | 24 | 25 | 26 | 27 |
| 28 | 29 | 30 | 31 |
- 그래프
- Algorithm
- dfs
- dp
- 타입 챌린지
- TCP
- 프로그래머스 레벨 2
- socket
- 소켓
- HTTP 완벽 가이드
- 백준
- 알고리즘
- 수학
- HTTP
- type challenge
- typescript
- 쉬운 문제
- BFS
- 프로그래머스
- Crawling
- 문자열
- 크롤링
- Nestjs
- javascript
- 가천대
- 자바스크립트
- ip
- 타입스크립트
- Node.js
- 레벨 1
- Today
- Total
kakasoo
5. 러스트 프로그래밍 시작 - 사용자 입력 받기 본문
러스트도 다른 언어와 같이 표준 라이브러리들을 제공한다. ( Node.js로 치면 코어 모듈과 같다 )
예를 들면 해시맵, 벡터, 그 외 수많은 자료구조가 존재하고 입출력 기본 요소 역시 포함된다.
이를 통해 사용자에게 직접 입력을 받아, 기존의 프로그램이 입력에 의해 동작하게끔 수정할 예정이다.
표준 라이브러리는 외부 크레이트로, 이 크레이트는 기본적으로 모든 곳에서 바로 사용할 수 있단 의미다.
std - Rust
§The Rust Standard Library The Rust Standard Library is the foundation of portable Rust software, a set of minimal and battle-tested shared abstractions for the broader Rust ecosystem. It offers core types, like Vec and Option , library-defined operations
doc.rust-lang.org
- 쓸만한 표준 라이브러리가 있는지는 해당 문서에서 찾아볼 수 있다.
지금 우리가 사용해야 하는 것은 Module std::io 문서를 보면 되는데, io는 입출력을 의미한다.
use std::io; // 어떤 외부 크레이트를 사용할지는 use로 명시 가능하다.

fn main() {
	let mars_weight = calcuate_weight_on_mars(100.0);
	println!("weight on Mars: {}kg", mars_weight);
}

fn calcuate_weight_on_mars (weight: f32) -> f32 {
	(weight / 9.81) * 3.711
}
use 키워드를 사용하여 어떤 라이브러리를 가져올지를 우선 명시한다.
use std::io; // 어떤 외부 크레이트를 사용할지는 use로 명시 가능하다.

fn main() {
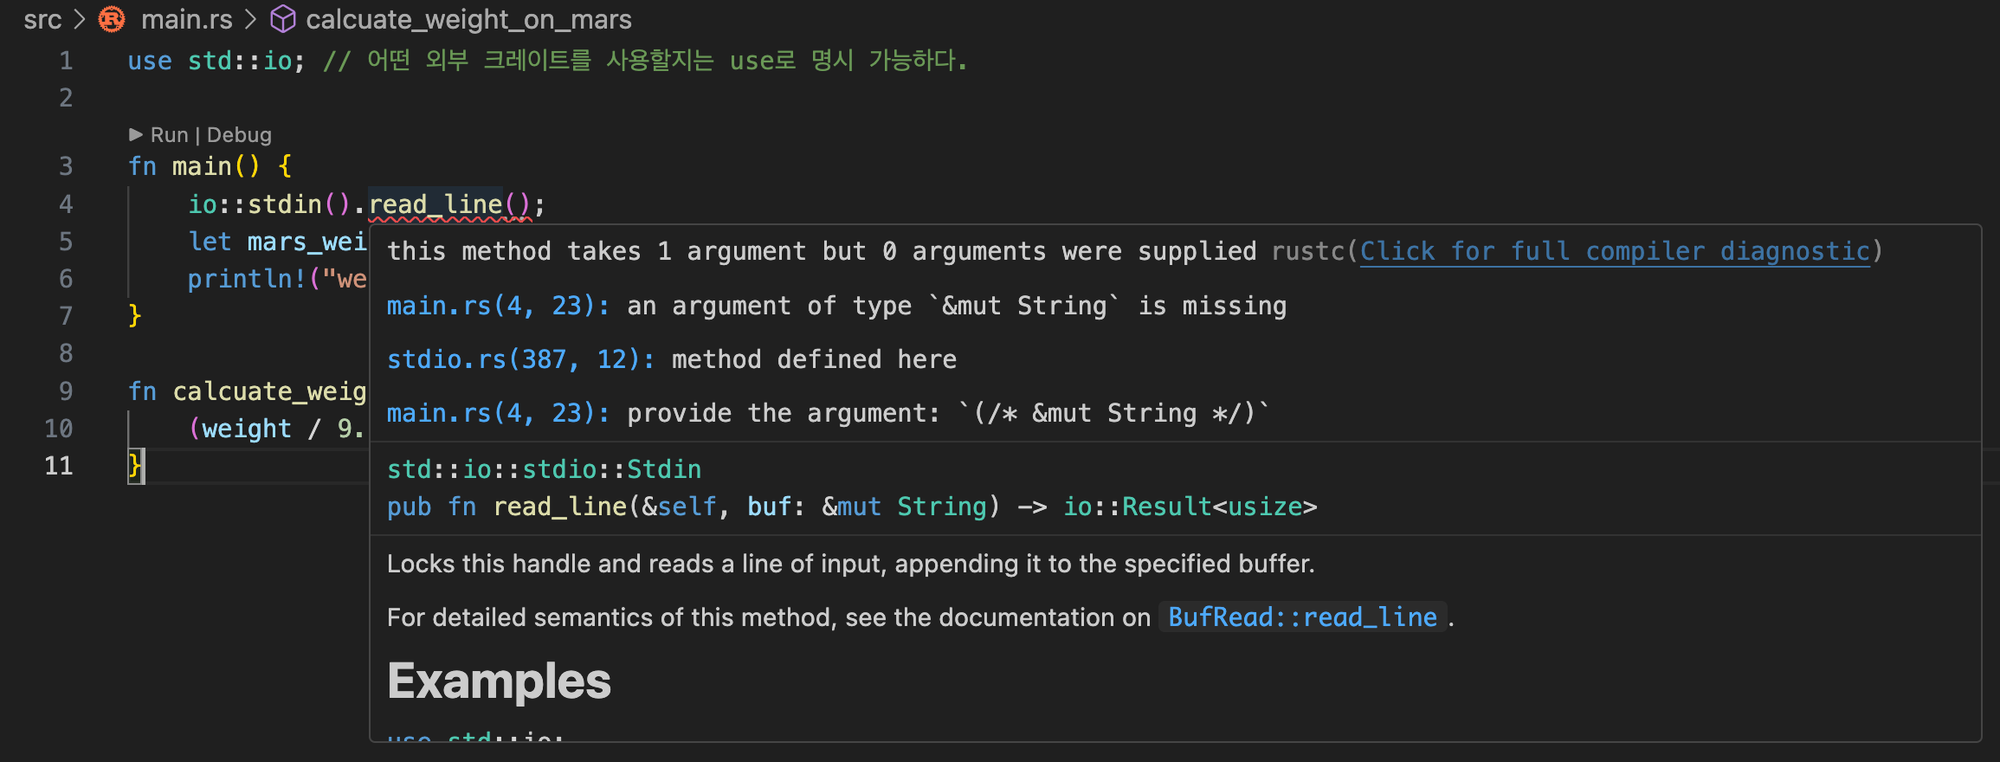
	io::stdin().read_line(); // ERROR : 파라미터를 명시하지 않았기 때문에 에러가 난다.
	let mars_weight = calcuate_weight_on_mars(100.0);
	println!("weight on Mars: {}kg", mars_weight);
}

fn calcuate_weight_on_mars (weight: f32) -> f32 {
	(weight / 9.81) * 3.711
}
타입스크립트 사용과 마찬가지로, 에러를 보고 싶다면 마우스를 호버하거나 커맨드를 누르면 된다.
커맨드 후 해당 함수를 클릭하면 외부 크레이트의 정의, 구현부로 이동하게 되는데 그러면 타입도 확인 가능하다.

/// Locks this handle and reads a line of input, appending it to the specified buffer.
///
/// For detailed semantics of this method, see the documentation on
/// [`BufRead::read_line`].
///
/// # Examples
///
/// ```no_run
/// use std::io;
///
/// let mut input = String::new();
/// match io::stdin().read_line(&mut input) {
///     Ok(n) => {
///         println!("{n} bytes read");
///         println!("{input}");
///     }
///     Err(error) => println!("error: {error}"),
/// }
/// ```
///
/// You can run the example one of two ways:
///
/// - Pipe some text to it, e.g., `printf foo | path/to/executable`
/// - Give it text interactively by running the executable directly,
///   in which case it will wait for the Enter key to be pressed before
///   continuing
#[stable(feature = "rust1", since = "1.0.0")]
pub fn read_line(&self, buf: &mut String) -> io::Result<usize> {
    self.lock().read_line(buf)
}
주석으로 친절하게 사용법도 작성되어 있는데 우리가 원하는 건 기본 타입이기 때문에 파라미터만 보면 된다.
아직은 모르는 키워드들이 많은데 전부 무시하고, buf의 타입만 보면 된다.
pub fn read_line(&self, buf: &mut String) -> io::Result<usize>
이 부분만 떼놓고 보면 read_line은 이렇게 정의되어 있는 것을 확인할 수 있다.
&mut String이므로, 값이 변경될 수 있는 String 변수를 대입해달라는 의미가 될 것이다.
use std::io; // 어떤 외부 크레이트를 사용할지는 use로 명시 가능하다.

fn main() {
    let mut input = String::new(); // 구조체를 사용하여 빈 문자열을 생성한다.
	io::stdin().read_line(&mut input); // 주소를 참조할 수 있도록 &mut로 명시한다.
	let mars_weight = calcuate_weight_on_mars(100.0);
	println!("weight on Mars: {}kg", mars_weight);
}

fn calcuate_weight_on_mars (weight: f32) -> f32 {
	(weight / 9.81) * 3.711
}
'프로그래밍 > Rust' 카테고리의 다른 글
| 7. 참조와 사용 (0) | 2024.03.31 |
|---|---|
| 6. 소유권 (Ownership) (0) | 2024.03.30 |
| 4. 러스트 프로그래밍 시작 - 함수 작성하기 (0) | 2024.03.24 |
| 3. 러스트 매크로 (0) | 2024.03.24 |
| 2. vscode에서 러스트 디버깅 하는 법 (0) | 2024.03.24 |


